When selecting students to play the oboe, in regards to embouchure, I look for students with a full lower lip. The student should have moderately long fingers in order to cover the tone holes and to reach all keys without destroying proper hand position. This is a challenging instrument, so I always ask the student about their organizational skills, what kind of student they are, do they keep a tidy room, etc. These are just character traits of students that tend to be drawn to the oboe.
I teach the student how to form the embouchure, how to set the reed, and then I have them produce a crow on the reed. Some students don't have much breath control and have a difficult time producing a crow. I then place the reed in the instrument and set the reed on the students embouchure. With the instrument turned around backwards, I am able to finger notes while the student produces the tone. This give me an idea of their ability to maintain a consistent air stream and to maintain the embouchure.
I teach the student how to form the embouchure, how to set the reed, and then I have them produce a crow on the reed. Some students don't have much breath control and have a difficult time producing a crow. I then place the reed in the instrument and set the reed on the students embouchure. With the instrument turned around backwards, I am able to finger notes while the student produces the tone. This give me an idea of their ability to maintain a consistent air stream and to maintain the embouchure.
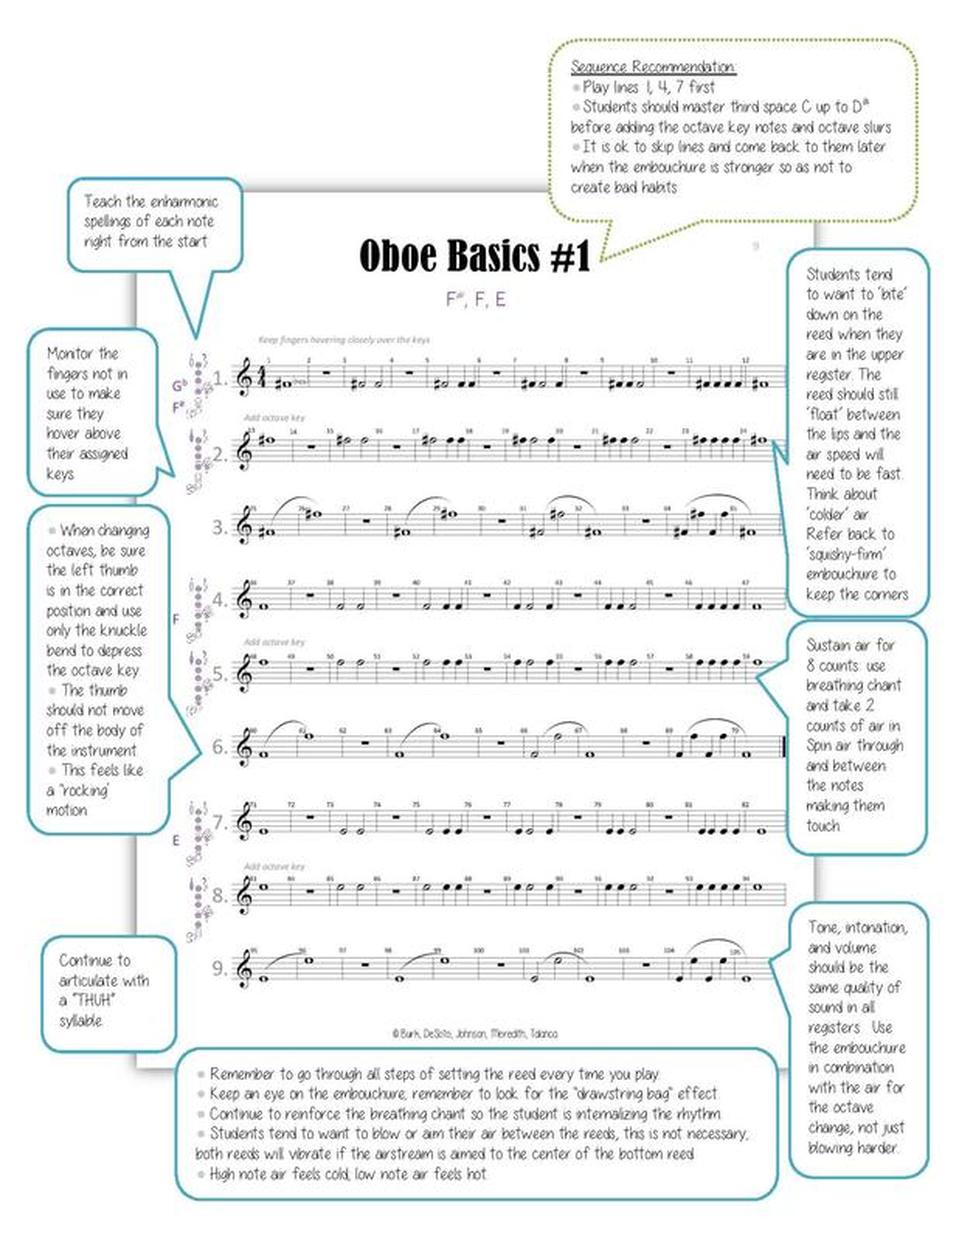
EXERCISES FOR TONE DEVELOPMENT ON OBOE
Long Tones
Long Tones
- Always use a metronome
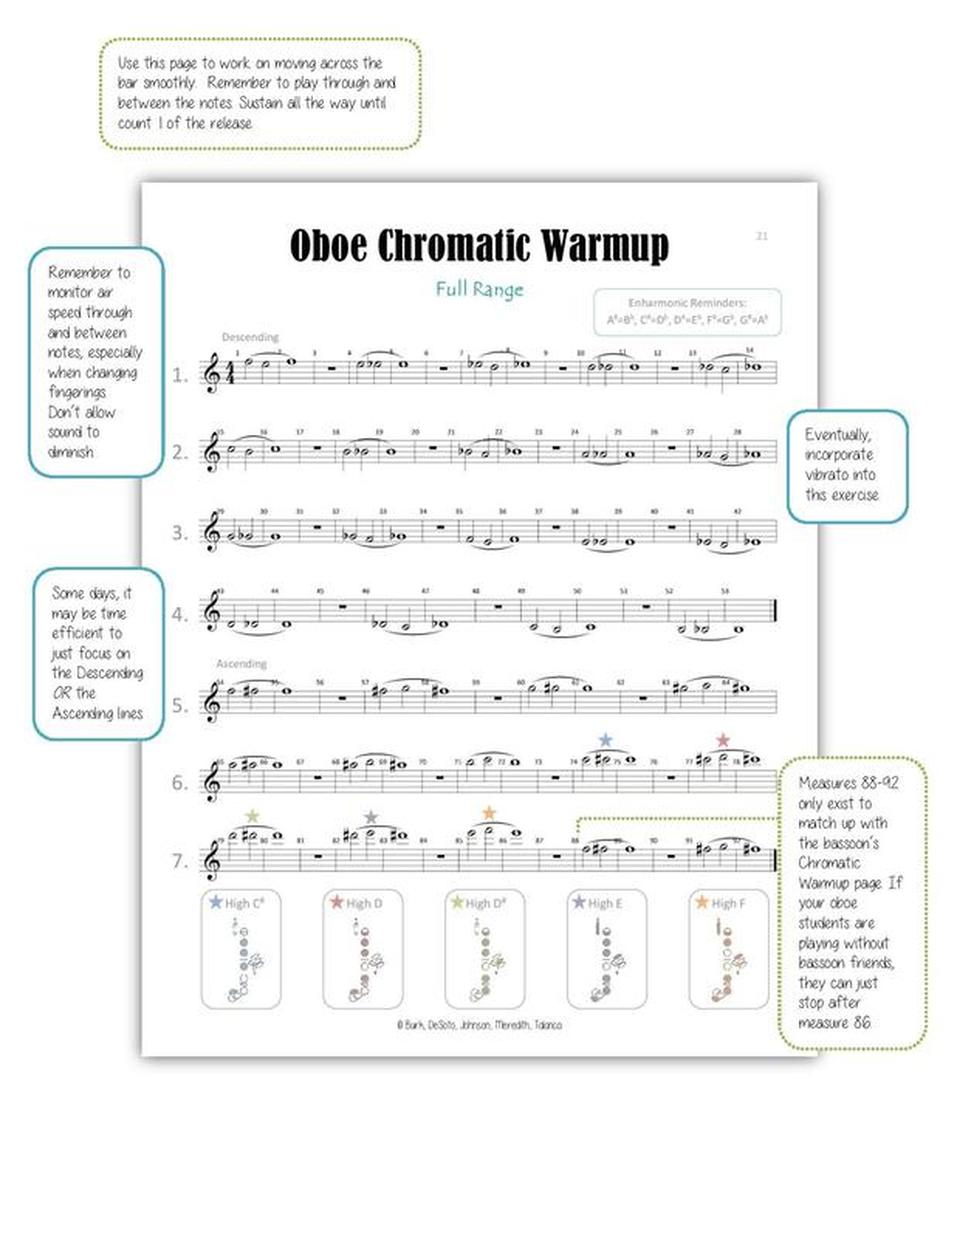
- Use a chromatic study so as to work each note on the oboe
- Know what kind of sound you are working for before you begin
- Make each note have the same quality of sound
- Take time to listen and redo undesirable sounds
- Begin each practice session with long tones
- Working between 3rd space C and C#, D, & D#
- Work to match tone
- Work to move smoothly and evenly between the half hole and non-half hole fingerings
- Work to facilitate the 'rolling' action of the index finger
- Practical Range
- Low Bb (one ledger line below the staff) to high F (3 ledger lines above the staff)
- Dynamics
- Use a long tone study to work on controlled dynamic changes like crescendo's and decrescendo's
- Students must learn to control the velocity of air through the reed with the embouchure
- Maintaining a constant pitch/intonation throughout a crescendo or decrescendo is how students can develop that breath control
- A difficult concept for you students, so spend a lot of time on playing soft dynamics, using correct embouchure and air
- Pitch flattens in louder dynamics
- Pitch sharpens in softer dynamics
- For louder dynamics
- Relax the emboucure to allow the reed to open up so that more volume of air can pass throught
- For softer dynamics
- Support the reed more with the embouchure - surrounding the reed, not just from top to bottom
- Use a long tone study to work on controlled dynamic changes like crescendo's and decrescendo's
- Flat tendencies
- Bb, B, C, C# below the staff
- 4th line D
- Bb one ledger line above the staff
- Sharp tendencies
- 1st line E
- 1st space F & F#
- 2nd line G
- 2nd space Ab
- 4th space E
- G# on top of the staff
- 2nd ledger line D#
- 3rd ledger line E & F
- Other elements that might affect pitch
- Reed
- Reed placement
- Embouchure
- Single Tongue
- The tongue should move in an up and down motion not a back and forth motion
- Strength of articulation
- Determined by the strength of the air
- Note length
- Determined by how long the tongue stays on the reed
- Legato - fast, light motion
- Staccato - the tongue restricts the vibration and stays on the reed longer
- Use the articulation syllable to 'release the air'
- The tongue should touch the tip of the reed slightly back from the tip of the tongue
- Strive to imagine only one tiny row of taste buds on the reed
- Keep the tongue motion as far forward as is functional
- Use a 'TUH' or a 'THUH' syllable
- The anatomy of an articulation syllable should be consonant, vowel, and always end in an 'H'
- The 'H' at the end is very important for projecting the sound and give the sound a 'floating' quality (resonance)
- The 'H' helps to propel the sound and helps students avoid stopping the sound with a consonant
- Too heavy or a 'pop' sound
- Generally too much pressure from the tongue on the reed
- Use only on e 'row' of taste buds on the edge of the tip of the reed
- The reed could be too soft
- Sluggish tongue
- Make sure the reed is not too stiff/hard
- Student may be moving the back of the tongue - keep motion to the front part of the tongue
- 'Pecky' tonguing
- Not following through with air
- Interrupt the air stream with the tongue
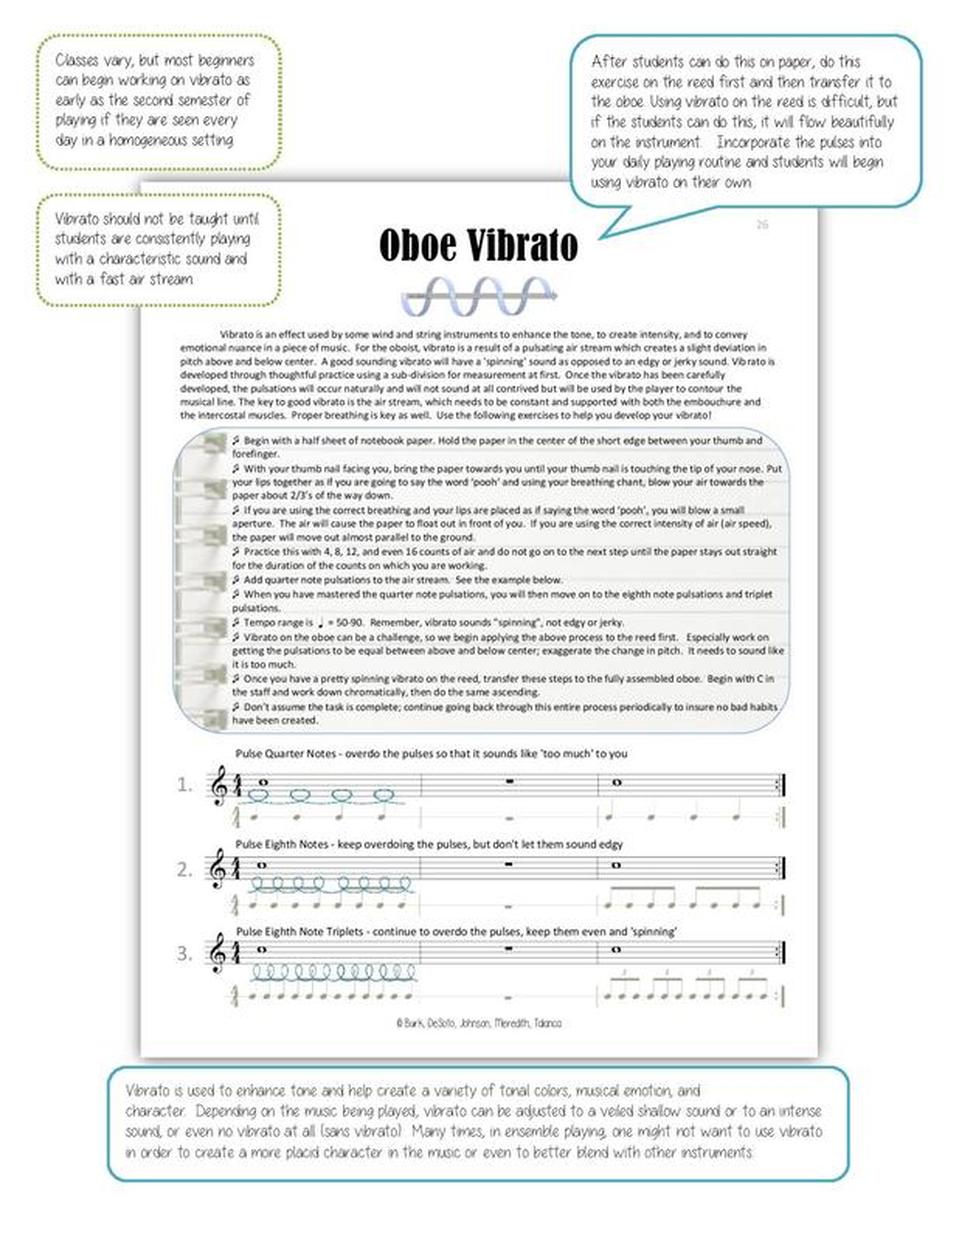
- Vibrato is used to enhance the music
- It should never be a distraction
- It should always be in the character of the music being played
- It should pin/flow naturally and become part of the tone
- It is an expressive tool
- Subdivision method (Diaphragmatic vibrato is recommended for oboe)
- Begin with half a sheet of notebook paper
- Use the paper vertically - 8 1/2 inches from top to bottom
- Hold the paper between your thumb and index finger in the center at the top of the paper
- Place the thumbnail that is grasping the paper on the tip of your nose; the paper will be hanging directly in front of your mouth/face
- With a 'pooh' syllable, blow towards the paper at a downward angle in whole notes, half note pulses, quarter note pulses, duple 8th note pulses, then finally triple 8th note pulses
- Transfer this immediately to the instrument
- The vibrato should be over done at first in order for it to be heard
- Remember, the player can hear it or imagine that they are hearing it, but is has to be projected in order for the listener to hear it
- Vibrato pulses can be practiced on just the reed; if the student can produce a good pulsation on the reed, then it will transfer to the oboe easily.
- The vibrato should be well modulated evenly above and below the centered pitch
- The speed of the vibrato is really dependent upon the music that is being played and the character of the music
- Vibrato should never sound strident, but rather 'spinning'
- Vibrato should be practiced at varying speeds and widths in order to develop a variety of expressive possibilities
- Begin with half a sheet of notebook paper
- Choo-choo train method
- Begin with the same half sheet of paper with the same placement
- Begin by slowly blowing puffs of air (like blowing out a candle) and gradually increasing the speed of the air puffs until they begin to connect into a solid air stream but with pulses.
- Transfer to the instrument (or reed first)
- Developing finger/tongue technique
- Start early with ‘finger wiggles’
- Simple exercises that go back and forth between 2 or 3 notes within the range of the students
- Start slow and gradually speed up the exercises establishing a good habit slow to fast
- Use scales to develop speed
- Remember that hand position is extremely important and can keep a student from progressing
- Watch for finger height; keep them low to the keys
- Begin with tetra chords, then one octave scales, two octave scales, and so on
- Fingerings in the third octave can sometimes be confusing for the beginning oboist – isolate these portions of the scales and work on the coordination of the fingers and memorization of the finger combinations
- The fingerings that incorporate the use of all of the left & right hand pinky keys can be confusing at first. Spend time developing that low range for better results in the upper register
- Use oboe specific method books for further development exercises
- Start early with ‘finger wiggles’
